
A way to copy files in windows from a Samba Share is by using Windows Explorer. You can mount your Linux VPS disk in Windows using the SMB/CIFS protocol, this guide will show you how to do that by installing Samba on a VPS and then by mounting that directory on a Windows machine.
Create a specific user that will not be able to login via SSH and the Samba share will point to that user’s home directory, there should be no access outside of this directory.
Installation
The installation begins with the following command:
After the command is executed and the packages are successfully installed, let’s update the configuration.
First a copy of the configuration file as backup:
Then let’s open the config file with nano so we can edit the configuration:
The following configuration allows authentication of added Samba users and give them access to save data in the user’s home directory. That is, each user added can access the server via Samba/SMB/CIFS and access the files in their home directory.
[Global]
workgroup = workgroup
server string =% h server (Samba% v)
log file = /var/log/samba/log.%m
max log size = 1000
encrypt passwords = true
invalid users = root
socket options = TCP_NODELAY
security = user
unix extensions = yes[Homes]
comment = Home Directories
browseable = no
valid users =%S
read only = no
create mask = 0600
directory mask = 0700
Save the config file and exit nano.
Then we restart the Samba server to load the updated configuration:
Create users and add to Samba
As a security measure we do not allow the samba users to login to the system, this way if a username/password combination gets out, only the files in that shared directory is accessible, not the rest of the VPS.
In this example, the username will be shareuser1:
Follow the on screen instructions and enter the information about the account you are creating.
When the user has been created, we add the user to the Samba database and assign a password.
This is the command which is used to add the user shareuser1 to the Samba database and enable access to the shared folder.
If you get this error message in return when trying to set the password:
This means that the user account is not found and the adduser command above failed. Go back and add the user again, watch for error messages.
Short note on some Samba commands that is good to know about
Some/all options are only available when running smbpasswd as root, so to make sure they are working, execute as root.
Add and activate user accounts (there must be a system user with that username)
This option specifies that the username following should be deleted from the local smbpasswd file.
This option specifies that the username following should be disabled in the local smbpasswd file
This option specifies that the username following should be enabled in the local smbpasswd file, if the account was previously disabled.
Time to get back to the guide and the last part, adding the Samba folder in Windows.
Map Network drive in Windows:
Press the WINDOWS + E keys on your keyboard to open Windows Explorer.
Images shown here are from a Windows Server 2008 installation
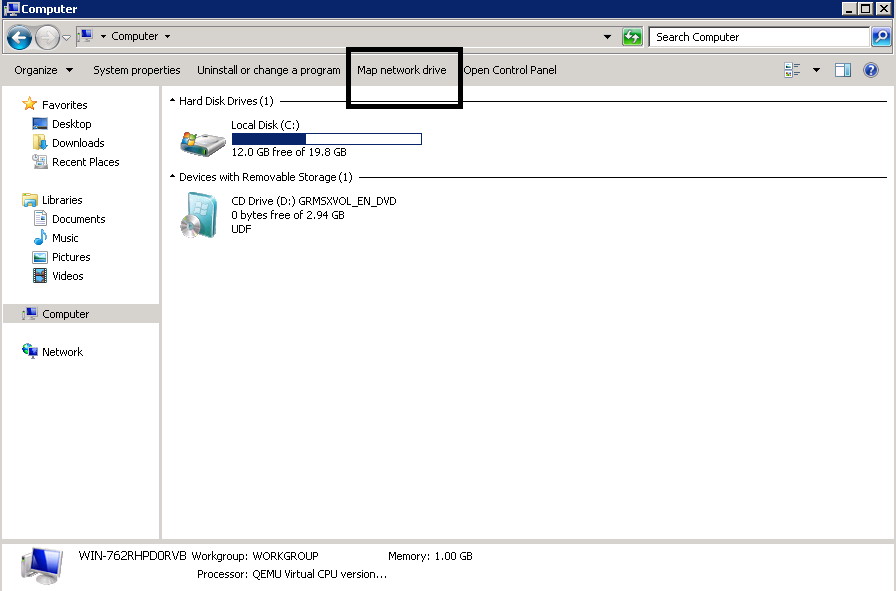
Click on the Computer menu and then on the Map Network Drive icon to open the Map Network Drive Dialog.
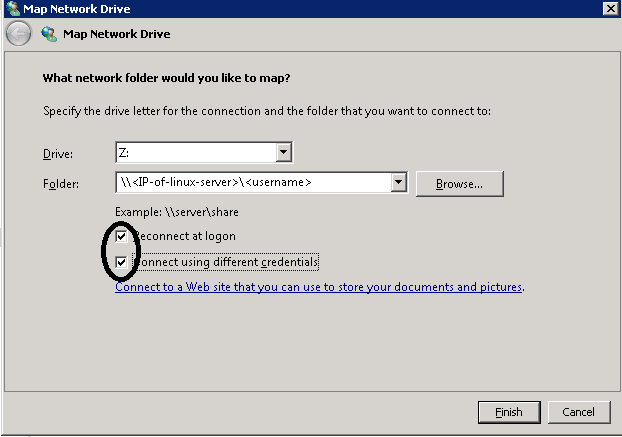
Select the Drive letter that you would like it to have on your local desktop and enter the network path in the Folder box.
Make sure you tick the Connect using different credentials box.
When clicking on the Finish button you will be presented with a login dialog where you enter the username and password that you used above.
Your network hard drive is successfully installed, configured and integrated into Windows.
If you can’t connect to your samba share, make sure you check other applications as your firewall and/or services that are disabled that is needed.