

When you think of the Linux /etc directory, one thing comes to mind: configuration. There’s a good reason for that; most of your system configuration files are held in this crucial directory. In fact, nearly everything but your user configurations are housed within /etc, so the importance of this directory cannot be overstated.
That is why it’s important to monitor the changes that occur within this directory. Having the ability to handle version control of /etc would make rolling back from a mistake to one of your data center Linux servers significantly easier. Unfortunately, unless your distribution makes use of the btrfs file system, there’s no real no version control built in. That’s why tools like etckeeper should be considered must haves.
etckeeper is a set of tools that allows you to keep track of changes to /etc using a Git, Mercurial, Bazaar, or Darcs repository like you would keep track of changes to a software project. The repository is housed on your local machine (in /etc/.git) and is automatically updated once daily.
I will walk you through the installation and usage of etckeeper, using a git repository, on Ubuntu 16.04 Server.
The first thing we must do is install the necessary components.
This can be done with a single command:
sudo apt-get install etckeeper git-core
Once this is handled, let’s tell git who we are with the commands:
git config –global user.name “YOUR NAME”
?git config –global user.email YOUR EMAIL
Where YOUR NAME is your actual name and YOUR EMAIL is your email address.
Configure etckeeper
There is only one configuration file for etckeeper, /etc/etckeeper/etckeeper.conf. Open that file for editing and look at the top, where you’ll see the following:
# The VCS to use.
?# VCS=”hg”
?VCS=”git”
?# VCS=”bzr”
?# VCS=”darcs”
If the line VCS=”git” is commented out, remove the # character and comment out whatever line was uncommented by default (by adding a leading # to the line). That’s all the change you need to make. Save and close the configuration file.
Initialize etckeeper
Now we must initialize etckeeper. Go back to the terminal window and issue the following command:
sudo etckeeper init
You should see the following report:
Initialized empty Git repository in /etc/.git/
Next we’ll run our initial commit with the command:
sudo etckeeper commit “Initial commit.”
Make some changes
Let’s make some changes to the /etc directory. We’ll do this by way of an upgrade. Run the following commands:
sudo apt-get update
?sudo apt-get upgrade
Once those commands complete, issue the command:
sudo git log –summary -1
You should see a listing of the changes that occurred to the /etc directory (Figure A).
Figure A

etckeeper is doing its thing.
What if you make a change to a configuration file? Let’s change the ServerAdmin option in /etc/apache2/sites-available/000-default.conf file. Once we’ve made the change, save and close the file. Now we run the command sudo git status to see the change has been recorded (Figure B).
Figure B

Note: You might notice, that I didn’t use the sudo command in the images. Because this is a test environment (running as a virtual machine), I first issue the command sudo -s to change to the root user. I don’t advise doing that on a production machine…stay out of root.
Finally, we commit the change with the command:
sudo etckeeper commit “Updated Apache configuration”
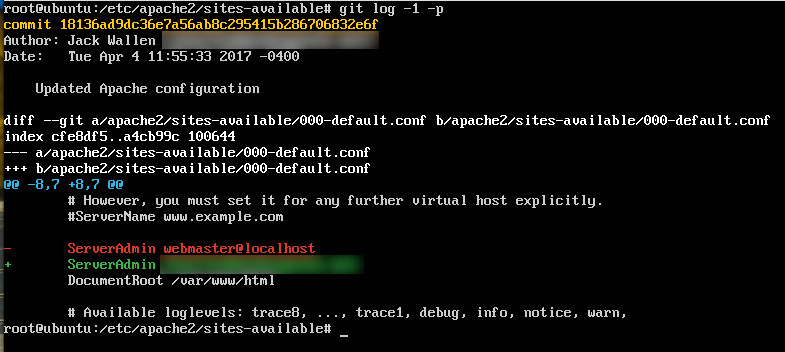
Now if we run sudo git log -1 -p the change will be visible in the log (Figure C).
Figure C
Revision history at the ready
That’s all there is to it. You now have the ability to retain a complete revision history of your /etc directory. Anyone that has encountered issues with the /etc directory will understand the importance of having such a system in place. It is important, however, that you run a commit anytime you make a change to /etc. Yes, etckeeper will do a daily run, but if you want to make those changes easier to find, I highly recommend doing a manual etckeeper commit when you make a change to /etc.